Networking
- Network info from google
- Reh Hat docs on networking
- Configuring an Ethernet connection by using nmcli
- Configuring an Ethernet connection by using nmtui
- Configuring an Ethernet connection by using control-center
- Configuring an Ethernet connection with a static IP address by using nmstatectl with an interface name
Network info from google
ifcfg file support, favoring key files in /etc/NetworkManager/system-connections/. The dhclient tool is also replaced by an internal DHCP client.- View Network Status:
ip a: View IP addresses and interface status.nmcli device status: Check device states.nmcli connection show: List active network profiles.
- Configure Networking (DHCP):
nmtui: Open the text-based user interface to edit connections.nmcli con add type ethernet con-name <name> ifname <interface>: Create a new DHCP connection.
- Configure Static IP:
nmcli con mod <connection> ipv4.addresses <ip/mask> ipv4.gateway <gateway> ipv4.method manual: Sets static IP.nmcli con mod <connection> ipv4.dns "8.8.8.8": Sets DNS servers.nmcli con up <connection>: Apply changes.
- Troubleshooting:
ping <host>: Test connectivity.ip route: View routing table.nmcli dev connect <interface>: Reconnect an interface.
- Hostname:
hostnamectl set-hostname <new_name>: Change the system hostname.
/etc/sysconfig/network-scripts/ format. Always use nmcli or nmtui to ensure configurations are properly saved in the new key file format.
Reh Hat docs on networking
https://docs.redhat.com/en/documentation/red_hat_enterprise_linux/10/html/configuring_and_managing_networking/index
Configuring an Ethernet connection by using nmcli
2.1. Configuring an Ethernet connection by using nmcli
If you connect a host to the network over Ethernet, you can manage the connection’s settings on the command line by using the nmcli utility.
Prerequisites
- A physical or virtual Ethernet Network Interface Controller (NIC) exists in the server’s configuration.
Procedure
-
List the NetworkManager connection profiles:
# nmcli connection show
NAME                UUID                                  TYPE      DEVICE
Wired connection 1  a5eb6490-cc20-3668-81f8-0314a27f3f75  ethernet  enp1s0
By default, NetworkManager creates a profile for each NIC in the host. If you plan to connect this NIC only to a specific network, adapt the automatically-created profile. If you plan to connect this NIC to networks with different settings, create individual profiles for each network.
-
If you want to create an additional connection profile, enter:
# nmcli connection add con-name <connection-name> ifname <device-name> type ethernetSkip this step to modify an existing profile.
-
Optional: Rename the connection profile:
# nmcli connection modify "Wired connection 1" connection.id "Internal-LAN"On hosts with multiple profiles, a meaningful name makes it easier to identify the purpose of a profile.
-
Display the current settings of the connection profile:
# nmcli connection show Internal-LAN ... connection.interface-name: enp1s0 connection.autoconnect: yes ipv4.method: auto ipv6.method: auto ... -
Configure the IPv4 settings:
-
To use DHCP, enter:
# nmcli connection modify Internal-LAN ipv4.method autoSkip this step if
ipv4.methodis already set toauto(default). -
To set a static IPv4 address, network mask, default gateway, DNS servers, and search domain, enter:
# nmcli connection modify Internal-LAN ipv4.method manual ipv4.addresses 192.0.2.1/24 ipv4.gateway 192.0.2.254 ipv4.dns 192.0.2.200 ipv4.dns-search example.com
-
-
Configure the IPv6 settings:
-
To use stateless address autoconfiguration (SLAAC), enter:
# nmcli connection modify Internal-LAN ipv6.method autoSkip this step if
ipv6.methodis already set toauto(default). -
To set a static IPv6 address, network mask, default gateway, DNS servers, and search domain, enter:
# nmcli connection modify Internal-LAN ipv6.method manual ipv6.addresses 2001:db8:1::fffe/64 ipv6.gateway 2001:db8:1::fffe ipv6.dns 2001:db8:1::ffbb ipv6.dns-search example.com
-
-
To customize other settings in the profile, use the following command:
# nmcli connection modify <connection-name> <setting> <value>Enclose values with spaces or semicolons in quotes.
For details about which settings you can modify, see the
nm-settings(5)man page on your system. -
Activate the profile:
# nmcli connection up Internal-LAN
Verification
-
Display the IP settings of the NIC:
# ip address show enp1s0 2: enp1s0: <BROADCAST,MULTICAST,UP,LOWER_UP> mtu 1500 qdisc fq_codel state UP group default qlen 1000 link/ether 52:54:00:17:b8:b6 brd ff:ff:ff:ff:ff:ff inet 192.0.2.1/24 brd 192.0.2.255 scope global noprefixroute enp1s0 valid_lft forever preferred_lft forever inet6 2001:db8:1::fffe/64 scope global noprefixroute valid_lft forever preferred_lft forever -
Display the IPv4 default gateway:
# ip route show default default via 192.0.2.254 dev enp1s0 proto static metric 102 -
Display the IPv6 default gateway:
# ip -6 route show default default via 2001:db8:1::fffe dev enp1s0 proto static metric 102 pref medium -
Display the DNS settings:
# cat /etc/resolv.conf
search example.com
nameserver 192.0.2.200
nameserver 2001:db8:1::ffbb
If multiple connection profiles are active at the same time, the order of
nameserverentries depend on the DNS priority values in these profiles and the connection types. -
Use the
pingutility to verify that this host can send packets to other hosts:# ping <host-name-or-IP-address>
Troubleshooting
- Verify that the network cable is plugged-in to the host and a switch.
- Check whether the link failure exists only on this host or also on other hosts connected to the same switch.
- Verify that the network cable and the network interface are working as expected. Perform hardware diagnosis steps and replace defective cables and network interface cards.
- If the configuration on the disk does not match the configuration on the device, starting or restarting NetworkManager creates an in-memory connection that reflects the configuration of the device. For further details and how to avoid this problem, see the Red Hat Knowledgebase solution NetworkManager duplicates a connection after restart of NetworkManager service.
Configuring an Ethernet connection by using nmtui
If you connect a host to an Ethernet network, you can manage the connection’s settings in a text-based user interface. Use the nmtui application to create new profiles and to update existing ones on a host without a graphical interface.
In nmtui:
Prerequisites
- A physical or virtual Ethernet Network Interface Controller (NIC) exists in the server’s configuration.
Procedure
-
If you do not know the network device name you want to use in the connection, display the available devices:
# nmcli device status DEVICE TYPE STATE CONNECTION enp1s0 ethernet unavailable -- ... -
Start
nmtui:# nmtui - Select Edit a connection, and press Enter.
-
Choose whether to add a new connection profile or to modify an existing one:
-
To create a new profile:
- Press Add.
- Select Ethernet from the list of network types, and press Enter.
- To modify an existing profile, select the profile from the list, and press Enter.
-
-
Optional: Update the name of the connection profile.
On hosts with multiple profiles, a meaningful name makes it easier to identify the purpose of a profile.
- If you create a new connection profile, enter the network device name into the Device field.
-
Depending on your environment, configure the IP address settings in the
IPv4 configurationandIPv6 configurationareas accordingly. For this, press the button next to these areas, and select:- Disabled, if this connection does not require an IP address.
- Automatic, if a DHCP server dynamically assigns an IP address to this NIC.
-
Manual, if the network requires static IP address settings. In this case, you must fill further fields:
- Press Show next to the protocol you want to configure to display additional fields.
-
Press Add next to Addresses, and enter the IP address and the subnet mask in Classless Inter-Domain Routing (CIDR) format.
If you do not specify a subnet mask, NetworkManager sets a
/32subnet mask for IPv4 addresses and/64for IPv6 addresses. - Enter the address of the default gateway.
- Press Add next to DNS servers, and enter the DNS server address.
- Press Add next to Search domains, and enter the DNS search domain.
Figure 2.1. Example of an Ethernet connection with static IP address settings
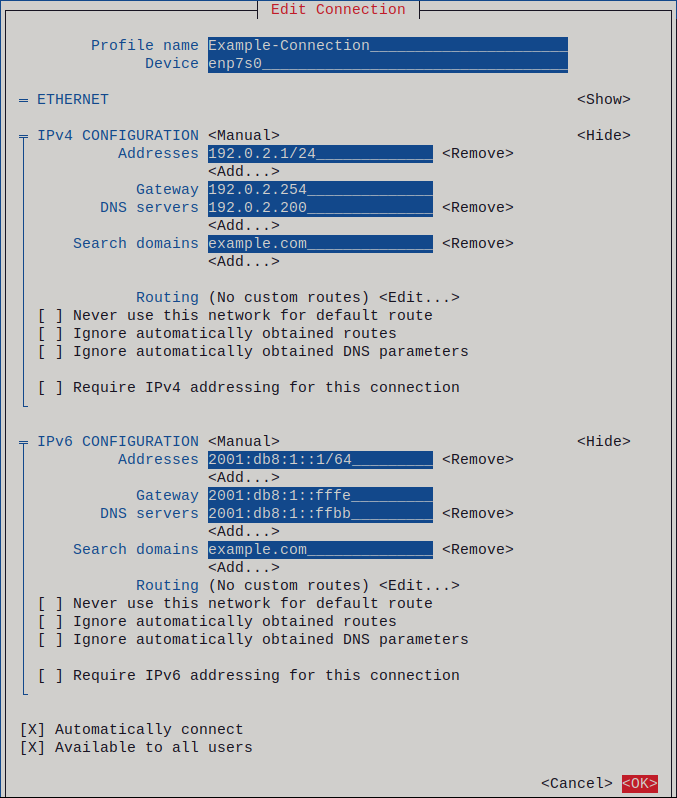
- Press OK to create and automatically activate the new connection.
- Press Back to return to the main menu.
- Select Quit, and press Enter to close the
nmtuiapplication.
Verification
-
Display the IP settings of the NIC:
# ip address show enp1s0 2: enp1s0: <BROADCAST,MULTICAST,UP,LOWER_UP> mtu 1500 qdisc fq_codel state UP group default qlen 1000 link/ether 52:54:00:17:b8:b6 brd ff:ff:ff:ff:ff:ff inet 192.0.2.1/24 brd 192.0.2.255 scope global noprefixroute enp1s0 valid_lft forever preferred_lft forever inet6 2001:db8:1::fffe/64 scope global noprefixroute valid_lft forever preferred_lft forever -
Display the IPv4 default gateway:
# ip route show default default via 192.0.2.254 dev enp1s0 proto static metric 102 -
Display the IPv6 default gateway:
# ip -6 route show default default via 2001:db8:1::fffe dev enp1s0 proto static metric 102 pref medium -
Display the DNS settings:
# cat /etc/resolv.conf
search example.com
nameserver 192.0.2.200
nameserver 2001:db8:1::ffbb
If multiple connection profiles are active at the same time, the order of
nameserverentries depend on the DNS priority values in these profiles and the connection types. -
Use the
pingutility to verify that this host can send packets to other hosts:# ping <host-name-or-IP-address>
Troubleshooting
- Verify that the network cable is plugged-in to the host and a switch.
- Check whether the link failure exists only on this host or also on other hosts connected to the same switch.
- Verify that the network cable and the network interface are working as expected. Perform hardware diagnosis steps and replace defective cables and network interface cards.
- If the configuration on the disk does not match the configuration on the device, starting or restarting NetworkManager creates an in-memory connection that reflects the configuration of the device. For further details and how to avoid this problem, see the Red Hat Knowledgebase solution NetworkManager duplicates a connection after restart of NetworkManager service.
Configuring an Ethernet connection by using control-center
If you connect a host to the network over Ethernet, you can manage the connection’s settings with a graphical interface by using the GNOME Settings menu.
Note that control-center does not support as many configuration options as the nmcli utility.
Prerequisites
- A physical or virtual Ethernet Network Interface Controller (NIC) exists in the server’s configuration.
- GNOME is installed.
Procedure
- Press the Super key, enter
Settings, and press Enter. - Select Network in the navigation on the left.
-
Choose whether to add a new connection profile or to modify an existing one:
- To create a new profile, click the button next to the Ethernet entry.
- To modify an existing profile, click the gear icon next to the profile entry.
-
Optional: On the Identity tab, update the name of the connection profile.
On hosts with multiple profiles, a meaningful name makes it easier to identify the purpose of a profile.
-
Depending on your environment, configure the IP address settings on the IPv4 and IPv6 tabs accordingly:
- To use DHCP or IPv6 stateless address autoconfiguration (SLAAC), select
Automatic (DHCP)as method (default). -
To set a static IP address, network mask, default gateway, DNS servers, and search domain, select
Manualas method, and fill the fields on the tabs: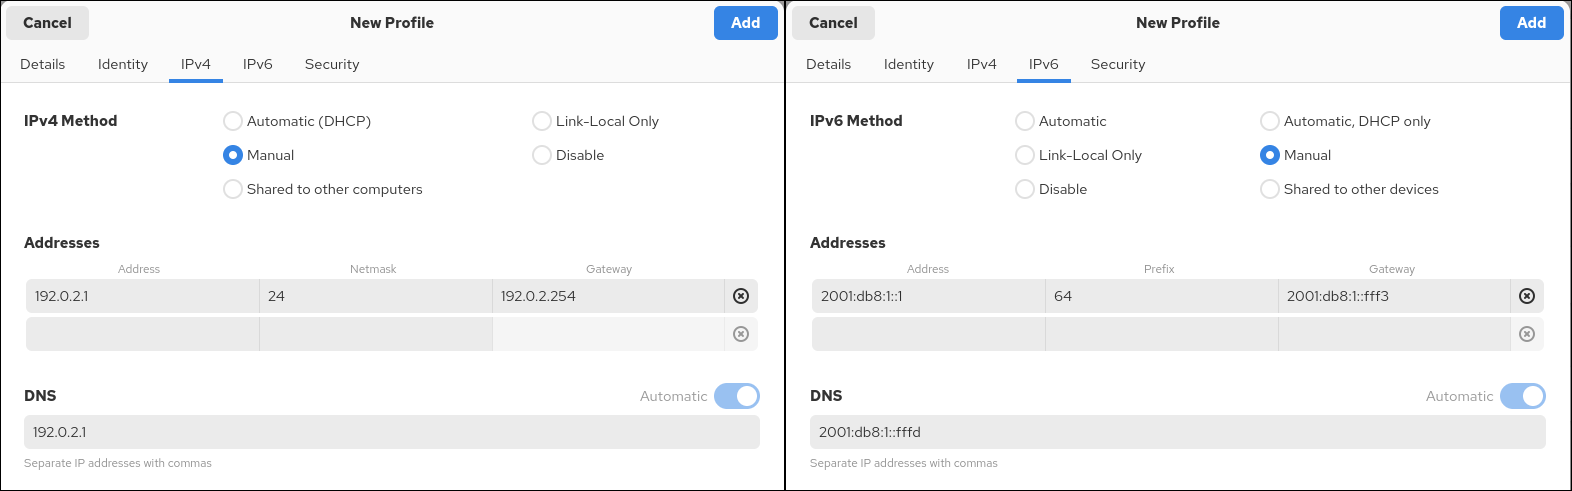
- To use DHCP or IPv6 stateless address autoconfiguration (SLAAC), select
-
Depending on whether you add or modify a connection profile, click the or button to save the connection.
The GNOME
control-centerautomatically activates the connection.
Verification
-
Display the IP settings of the NIC:
# ip address show enp1s0 2: enp1s0: <BROADCAST,MULTICAST,UP,LOWER_UP> mtu 1500 qdisc fq_codel state UP group default qlen 1000 link/ether 52:54:00:17:b8:b6 brd ff:ff:ff:ff:ff:ff inet 192.0.2.1/24 brd 192.0.2.255 scope global noprefixroute enp1s0 valid_lft forever preferred_lft forever inet6 2001:db8:1::fffe/64 scope global noprefixroute valid_lft forever preferred_lft forever -
Display the IPv4 default gateway:
# ip route show default default via 192.0.2.254 dev enp1s0 proto static metric 102 -
Display the IPv6 default gateway:
# ip -6 route show default default via 2001:db8:1::fffe dev enp1s0 proto static metric 102 pref medium -
Display the DNS settings:
# cat /etc/resolv.conf
search example.com
nameserver 192.0.2.200
nameserver 2001:db8:1::ffbb
If multiple connection profiles are active at the same time, the order of
nameserverentries depend on the DNS priority values in these profiles and the connection types. -
Use the
pingutility to verify that this host can send packets to other hosts:# ping <host-name-or-IP-address>
Troubleshooting steps
- Verify that the network cable is plugged-in to the host and a switch.
- Check whether the link failure exists only on this host or also on other hosts connected to the same switch.
- Verify that the network cable and the network interface are working as expected. Perform hardware diagnosis steps and replace defective cables and network interface cards.
- If the configuration on the disk does not match the configuration on the device, starting or restarting NetworkManager creates an in-memory connection that reflects the configuration of the device. For further details and how to avoid this problem, see the Red Hat Knowledgebase solution NetworkManager duplicates a connection after restart of NetworkManager service.
Configuring an Ethernet connection with a static IP address by using nmstatectl with an interface name
You can use the declarative Nmstate API to configure an Ethernet connection with static IP addresses, gateways, and DNS settings, and assign them to a specified interface name. Nmstate ensures that the result matches the configuration file or rolls back the changes.
Prerequisites
- A physical or virtual Ethernet Network Interface Controller (NIC) exists in the server’s configuration.
- The
nmstatepackage is installed.
Procedure
-
Create a YAML file, for example
~/create-ethernet-profile.yml, with the following content:--- interfaces: - name: enp1s0 type: ethernet state: up ipv4: enabled: true address: - ip: 192.0.2.1 prefix-length: 24 dhcp: false ipv6: enabled: true address: - ip: 2001:db8:1::1 prefix-length: 64 autoconf: false dhcp: false routes: config: - destination: 0.0.0.0/0 next-hop-address: 192.0.2.254 next-hop-interface: enp1s0 - destination: ::/0 next-hop-address: 2001:db8:1::fffe next-hop-interface: enp1s0 dns-resolver: config: search: - example.com server: - 192.0.2.200 - 2001:db8:1::ffbbThese settings define an Ethernet connection profile for the
enp1s0device with the following settings:- A static IPv4 address -
192.0.2.1with the/24subnet mask - A static IPv6 address -
2001:db8:1::1with the/64subnet mask - An IPv4 default gateway -
192.0.2.254 - An IPv6 default gateway -
2001:db8:1::fffe - An IPv4 DNS server -
192.0.2.200 - An IPv6 DNS server -
2001:db8:1::ffbb - A DNS search domain -
example.com
- A static IPv4 address -
-
Optional: You can define the
identifier: mac-addressandmac-address: <mac_address>properties in theinterfacesproperty to identify the network interface card by its MAC address instead of its name, for example:--- interfaces: - name: <profile_name> type: ethernet identifier: mac-address mac-address: <mac_address> ... -
Apply the settings to the system:
# nmstatectl apply ~/create-ethernet-profile.yml
Verification
-
Display the current state in YAML format:
# nmstatectl show enp1s0 -
Display the IP settings of the NIC:
# ip address show enp1s0 2: enp1s0: <BROADCAST,MULTICAST,UP,LOWER_UP> mtu 1500 qdisc fq_codel state UP group default qlen 1000 link/ether 52:54:00:17:b8:b6 brd ff:ff:ff:ff:ff:ff inet 192.0.2.1/24 brd 192.0.2.255 scope global noprefixroute enp1s0 valid_lft forever preferred_lft forever inet6 2001:db8:1::fffe/64 scope global noprefixroute valid_lft forever preferred_lft forever -
Display the IPv4 default gateway:
# ip route show default default via 192.0.2.254 dev enp1s0 proto static metric 102 -
Display the IPv6 default gateway:
# ip -6 route show default default via 2001:db8:1::fffe dev enp1s0 proto static metric 102 pref medium -
Display the DNS settings:
# cat /etc/resolv.conf
search example.com
nameserver 192.0.2.200
nameserver 2001:db8:1::ffbb
If multiple connection profiles are active at the same time, the order of
nameserverentries depend on the DNS priority values in these profiles and the connection types. -
Use the
pingutility to verify that this host can send packets to other hosts:# ping <host-name-or-IP-address>