Configuring an Ethernet connection by using control-center
If you connect a host to the network over Ethernet, you can manage the connection’s settings with a graphical interface by using the GNOME Settings menu.
Note that control-center does not support as many configuration options as the nmcli utility.
Prerequisites
- A physical or virtual Ethernet Network Interface Controller (NIC) exists in the server’s configuration.
- GNOME is installed.
Procedure
- Press the Super key, enter
Settings, and press Enter. - Select Network in the navigation on the left.
-
Choose whether to add a new connection profile or to modify an existing one:
- To create a new profile, click the button next to the Ethernet entry.
- To modify an existing profile, click the gear icon next to the profile entry.
-
Optional: On the Identity tab, update the name of the connection profile.
On hosts with multiple profiles, a meaningful name makes it easier to identify the purpose of a profile.
-
Depending on your environment, configure the IP address settings on the IPv4 and IPv6 tabs accordingly:
- To use DHCP or IPv6 stateless address autoconfiguration (SLAAC), select
Automatic (DHCP)as method (default). -
To set a static IP address, network mask, default gateway, DNS servers, and search domain, select
Manualas method, and fill the fields on the tabs: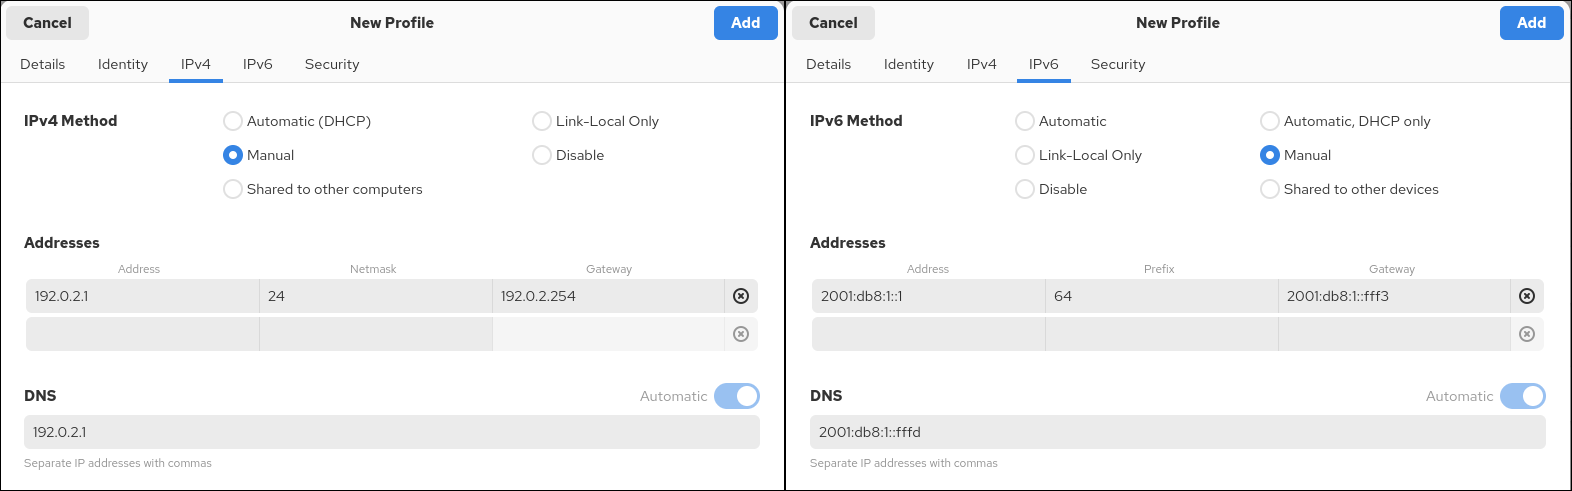
- To use DHCP or IPv6 stateless address autoconfiguration (SLAAC), select
-
Depending on whether you add or modify a connection profile, click the or button to save the connection.
The GNOME
control-centerautomatically activates the connection.
Verification
-
Display the IP settings of the NIC:
# ip address show enp1s0 2: enp1s0: <BROADCAST,MULTICAST,UP,LOWER_UP> mtu 1500 qdisc fq_codel state UP group default qlen 1000 link/ether 52:54:00:17:b8:b6 brd ff:ff:ff:ff:ff:ff inet 192.0.2.1/24 brd 192.0.2.255 scope global noprefixroute enp1s0 valid_lft forever preferred_lft forever inet6 2001:db8:1::fffe/64 scope global noprefixroute valid_lft forever preferred_lft forever -
Display the IPv4 default gateway:
# ip route show default default via 192.0.2.254 dev enp1s0 proto static metric 102 -
Display the IPv6 default gateway:
# ip -6 route show default default via 2001:db8:1::fffe dev enp1s0 proto static metric 102 pref medium -
Display the DNS settings:
# cat /etc/resolv.conf
search example.com
nameserver 192.0.2.200
nameserver 2001:db8:1::ffbb
If multiple connection profiles are active at the same time, the order of
nameserverentries depend on the DNS priority values in these profiles and the connection types. -
Use the
pingutility to verify that this host can send packets to other hosts:# ping <host-name-or-IP-address>
Troubleshooting steps
- Verify that the network cable is plugged-in to the host and a switch.
- Check whether the link failure exists only on this host or also on other hosts connected to the same switch.
- Verify that the network cable and the network interface are working as expected. Perform hardware diagnosis steps and replace defective cables and network interface cards.
- If the configuration on the disk does not match the configuration on the device, starting or restarting NetworkManager creates an in-memory connection that reflects the configuration of the device. For further details and how to avoid this problem, see the Red Hat Knowledgebase solution NetworkManager duplicates a connection after restart of NetworkManager service.